How to Install Java in Windows 10, 7, 8.1, XP?
Have you started learning Java recently? Or do you require Java JDK for your Android project? Nonetheless, let us see how we can go head and install Java and write our first Hello world program today.

Before we start, Let us see if you have already installed Java in your Laptop / PC. There might be a small chance you’ve already installed Java or your brother might have installed it for his projects 👻
Click on Start, Type
CMD in your search bar. Now when the Command Prompt opens,
just type java -version
If you have Java installed already, you will be informed about the current version of Java installed.

If you get a message saying java is not recognized, Let us now install Java 🚀
Let us install Java and write our Hello World program in 3 Steps.
1. Installing Java JDK:
Install which ever JDK do you want to install. It is preferred you install the latest JDK version but let us see how to install Java JDK 8 which is the LTS (Long Term Support) Version of Java JDK.

Click on JDK Download.
- Next, select which ever version is compatible with your PC / Laptop.

Hint: If you are using Windows, and confused if your architecture is x64 or x84, then Open the Start menu , type msinfo32 into the search box, and press Enter.
In System Summary on the left side, look to see if your System Type on the right side is either a x64-based PC or a x86-based PC
-
Accept the Terms and Conditions and Download the JDK.
-
After you download the .exe file, Open the file and begin installing the JDK.
I recommend to go with the default installation process and click on Next for all the steps.

Click on Close and complete installation. Congratulations! You’ve successfully completed Step 1: Installing Java JDK🎉🥳
2. Configuring Environment Variables to change the JDK PATH :
-
If you are using Windows 10, Press Windows Key+ R Or Click on Start, Click on Search and then type Environment Variables. Click on the Edit the System Environment Variables option.
-
If you are using
Windows 8.1, 7, XP, Right click on My Computer, Click Properties and go to advanced tab. Now select Environment Variables option.

After you go to Environment Variables,
Click on Path under User Variables section. Then select New…
Now Minimize the Environment Variables screen for a second. Let’s go to our C folder in our PC.
-
Go to This PC and select Windows (C:) folder.
-
Go to
Program Files folder. -
In this folder, Go to Java Folder.
-
Now move inside the version number folder. For me, the folder name was jdk-13.0.1.
-
Finally, Move inside
Bin folder.

Copy the path once you go into the Bin folder. For me, the Path was: C:\Program Files\Java\jdk-13.0.1\bin
Now copy your complete path and then open the New option in Environment Variables once again. We will create two variables: PATH and CLASSPATH
i. Give the variable name exactly as: PATH
Paste the URL you have copied earlier from your bin folder and paste it in the Variable value

Note (Follow this step if and only if you get an error): If you get an error saying you already have a variable called PATH existing,
Edit that Variable’s Path:
PATH = <JDK installation directory>\bin;%PATH%;
Here, %PATH% means previous PATH’s value.
i.e, if you already have a PATH variable that has value C:\Program Files\flutter ,
Edit that variable as: C:\Program Files\Java\jdk-13.0.1\bin;C:\Program Files\flutter;
Press Ok. Now let’s set few more User Variables similarly.
ii. You can follow a similar process to set CLASSPATH.

Press Ok and close the Application Window.
3. Final check
Now open Command Prompt again by searching for CMD in Run
Enter the command java -version
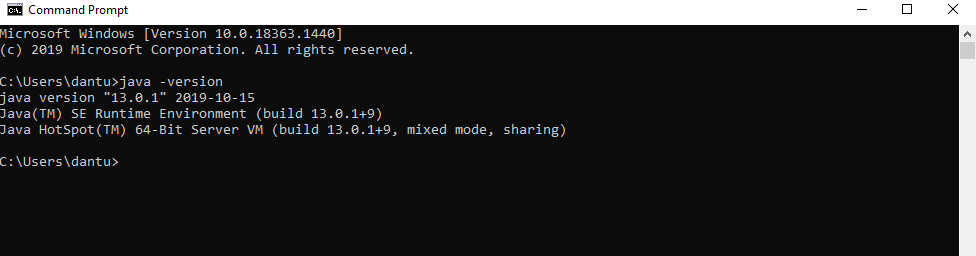
If you get the above result, then congratulations! You have successfully installed and configured Java JDK. Take a break and Celebrate 🎉✨
Let us look how we can write Java Programs and run them in further articles!
About me:
I’m Sai kamal, a Full Stack Developer 🚀 from Hyderabad, India. Currently a sophomore student contributing to various open-sourced projects and working on quite a few personal projects. Also part of a start-up company aiming high 🌟
I’m interested in Web Development, Machine learning and Data Science.
Check out my Portfolio at https://dantusaikamal.github.io/